Skift sprog :
Reguler tilbagetrækningskraften pneumatisk og undgå sløjfedannelse på robotter
Muligt med triflex® RSP-systemet
Pneumatisk tilbagetrækningssystem til robotapplikationer med flere akser. Tilbagetrækningslængder på 780 mm muliggør sikker styring af kabler og slanger, selv med store armdiametre og meget komplekse bevægelser. Tilbagetrækningskræfterne kan justeres trinløst ved hjælp af en pneumatisk cylinder. Uanset om det er lette eller tunge belastninger, lange eller korte robotarme - med RSP-tilbagetrækningssystemet kan tilbagetrækningskraften altid tilpasses den enkelte applikation.
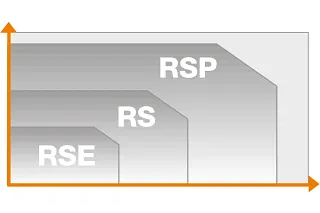
RSP | Det stærkeste af tilbagetrækningssystemerne
Tilbagetrækningskræfter indstillet i forhold
- Selv større e-kæder® kan føres sikkert op til ø 125 mm
- Justerbar, variabel tilbagetrækningskraft ved hjælp af en trykreguleringsventil
- Næsten konstant kraftkurve over hele banen, selv med tunge fyldninger
- Slutpositionen kan overvåges for at forhindre større skader i tilfælde af fejl
- Større tilbagetrækningskræfter end RS-systemet
- Monteringsmuligheder for mange robottyper og producenter med adapterbeslag
- Typiske anvendelsesområder: akse 3-6 på industrirobotter
- Lavt energiforbrug på grund af integreret trykluftbeholder
RSP-tilbagetrækningssystem i drift
- Særligt velegnet til store og tunge slangepakker
- Arbejde over hovedhøjde er heller ikke noget problem
- Altid konstante tilbagetrækningskræfter
Den nemmeste og hurtigste vej til det rigtige tilbagetrækningssystem
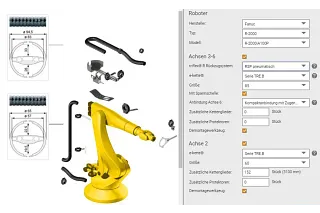
Konfiguratoren til robotudstyr
- Næsten alle robottyper fra Kuka, Fanuc, diagram og Yaskawa at vælge imellem
- En komplet pakke konfigureres med få klik
- Reservedelsliste direkte synlig online
- Kan tilpasses igen og igen
- Kan bestilles online
1 = bevægelig ende
2 = fast ende
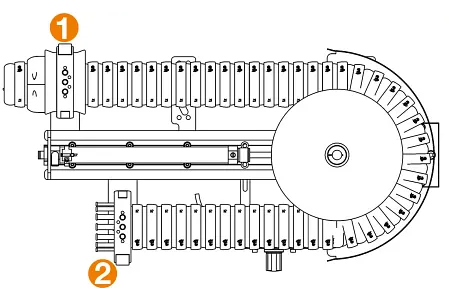
1 = bevægelig ende
2 = fast ende
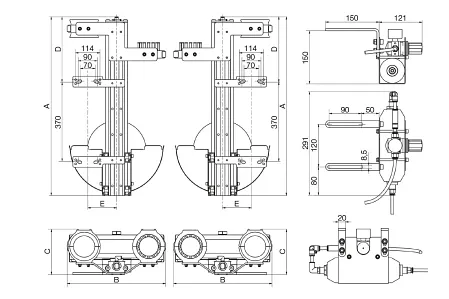
RSP-tilbagetrækningssystemer
Fast endeside (venstre eller højre) kan vælges
| Artikelnummer | max. Tilbagetrækningslængde i mm | Dim. A i mm | Dim. B i mm | Dim. C i mm | Dim. D i mm | Dim. E i mm |
|---|---|---|---|---|---|---|
| TR.RSP.60.L | 580 | 792 | 396 | 177 | 277 | 135 |
| TR.RSP.65.L | 580 | 792 | 396 | 177 | 277 | 135 |
| TR.RSP.70.L | 580 | 792 | 396 | 177 | 277 | 135 |
| TR.RSP.85.L | 620 | 836 | 461 | 213 | 306 | 135 |
| TR.RSP.100.L | 620 | 845 | 467 | 213 | 306 | 135 |
| TR.RSP.60.R | 580 | 792 | 396 | 177 | 277 | 135 |
| TR.RSP.65.R | 580 | 792 | 396 | 177 | 277 | 135 |
| TR.RSP.70.R | 580 | 792 | 396 | 177 | 277 | 135 |
| TR.RSP.85.R | 620 | 836 | 461 | 213 | 306 | 135 |
| TR.RSP.100.R | 620 | 845 | 467 | 213 | 306 | 135 |
| TR.RSP.125.R | 780 | 1,043 | 570 | 245 | 405 | 135 |
| TR.RSP.125.L | 780 | 1,043 | 570 | 245 | 405 | 135 |

1= Matchende triflex® R e-kæde® til RSP
2= samlet kædelængde = ekstra længde fra den glidende gennemføring LLLL + kædelængden i systemet
3 & 4= RSP-system (uden e-kæde®) +trykudligningsenhed +monteringsbeslag +glidende gennemføringer =
TR.RSP.XX.L eller TR.RSP.XX.R
Beregning af den samlede kædelængde | RS e-chain®
Læg kædelængden i systemet til standardlængden LLL (målt fra glidegennemføringen) = samlet kædelængde
| ø Indeks | R [mm] | Kædelængde inden for af systemet [mm] | Antal kædeled | Samlet kædelængde[mm] |
|---|---|---|---|---|
| 30. | - | - | - | - |
| 40. | - | - | - | - |
| 50. | - | - | - | - |
| 60. | 087 | 1,489 | 73 | LLL + 1489 |
| 65. | - | - | - | - |
| 70. | 110 | 1,484 | 58 | LLL + 1484 |
| 85. | 135 | 1,622 | 53 | LLL + 1622 |
| 85. (R 240) | - | - | - | - |
| 100. | 145 | 1,656 | 48 | LLL+1656 |
| 125. | 182 | 1940 | 44 | LLL+1962 |
Montering af RSP-system
Rådgivning
Jeg vil med glæde besvare deres spørgsmål personligt.
Levering og vejledning
Personlig betjening:
Mandag til fredag fra 7:00 til 20:00.
Lørdag fra 8:00 til 12:00.
Online:
24h